Monday, June 1, 2015

DIY Fern Planters


I used to have smaller pots next to our front door that looked so cluttered. I decided that two large planters on either side of our front door would be a good solution to create a clean look. I couldn't find anything to buy that was tall enough, so I decided to make my own! 

What you will need to buy at the store:
  • (12) pressure-treated pine fence pickets (5/8 in. x 5-1/2 in. x 6 ft). After looking at wood at my local home improvement store, I decided to go with the economical route and use treated fence picket wood. It was also on sale for $1.25 a piece!  
  • (4) #1 Pressure-Treated Lumber (2 in. x 2 in. x 8 ft)
  • (7) Pressure-Treated Fill-It Strip (8ft)
  • (2) Pressure-Treated Board (1 in. x 2 in. x 8 ft)
  • (2) boxes of 1-5/8 in. White All Purpose Screws
  • Sand paper (I already had some)
  • General tools like an electric screwdriver, saw, sander, measuring tape, nail gun, ruler, jig saw
  • Paint/Stain (I actually used espresso powder to stain my planters!)
  • Spray paint primer. 
  • Paint roller or brush
  • Wood filler

The left photo is a sketch of what I wanted to do. I then made a rendering on my computer to figure out the dimensions that I wanted to use.

The rendering shows that you can layout the wood boards side by side and figure out where to cut. My recommendation would be so start with measuring out 13.5" on the top (red line in photo) and 11" on the bottom (blue line). You can then draw straight lines to connect them (yellow lines).

This is where you have to concentrate and be accurate. Draw out all the lines and then you can start to cut. 

Set your saw so that it is on the same angle as the cuts you are making.

I numbered each piece BEFORE I started cutting. This was so helpful to keep track of where every piece goes. 

Once all the sides were cut; I laid them out to make sure everything was right. This is also your opportunity to move boards around. I like to have different wood coloration an each side of the planter.

I then stacked each side in order. We are ready to get this thing assembled! 

Cut the 2"x2"x8' lumber you bought into thirds. 32" long pieces. Arrange the boards onto the lumber. 

Start by screwing one side together. I decided to use screws instead of nails because I think the planters will be more sturdy. 

One side completed.


When you have two sides screwed together, put them on their sides. You can now screw on the side panels.

Here's a close up.

Third side.

Now you can screw on the last side.


At this stage, I took the planter outside to make sure that I liked it and to add an inner shelf that will hold up my fern. The fern pot was 10" tall, so I wanted my shelf to sit 10.5" from the top of the planter.

Jigsaw a leftover piece of wood so that it will fit into the planter diagonally. 

Measure down 10.5" and use some screws that will hold up the shelf.

Not bad!

It fit! 

At this point, I was ready to give up! 98 degrees in New Orleans is not the best time to work in a hot garage. I powered through though!  

Lightly sand the sides of the planters.

Now I started to create all the side pieces that will hide all the screws. Cut out the 1"x2" boards at a 45 degree angle. These pieces will be used as decorative trim on the top of the planter.

 Cut the fill-It Strips into 2' 9" pieces.

I now spray primed all the side pieces. Let dry over night.

This was my favorite part! I have used espresso powder to stain wood in the past. I really like the color after it drys AND it's non toxic AND I didn't have to go to the store again since I forgot to buy stain :). Mix a few tablespoons of espresso into warm water.

Roll it on and let dry over night. Day 1 complete!

Day 2! Use a nail gun to attach the corner pieces onto the planter.

When everything is nailed on, use wood filler to fill in the gaps.

Let dry a few hours.

Lightly sand the wood filler so that it is smooth.

Paint and let dry.

Add your plant and DONE!


Monday, May 18, 2015

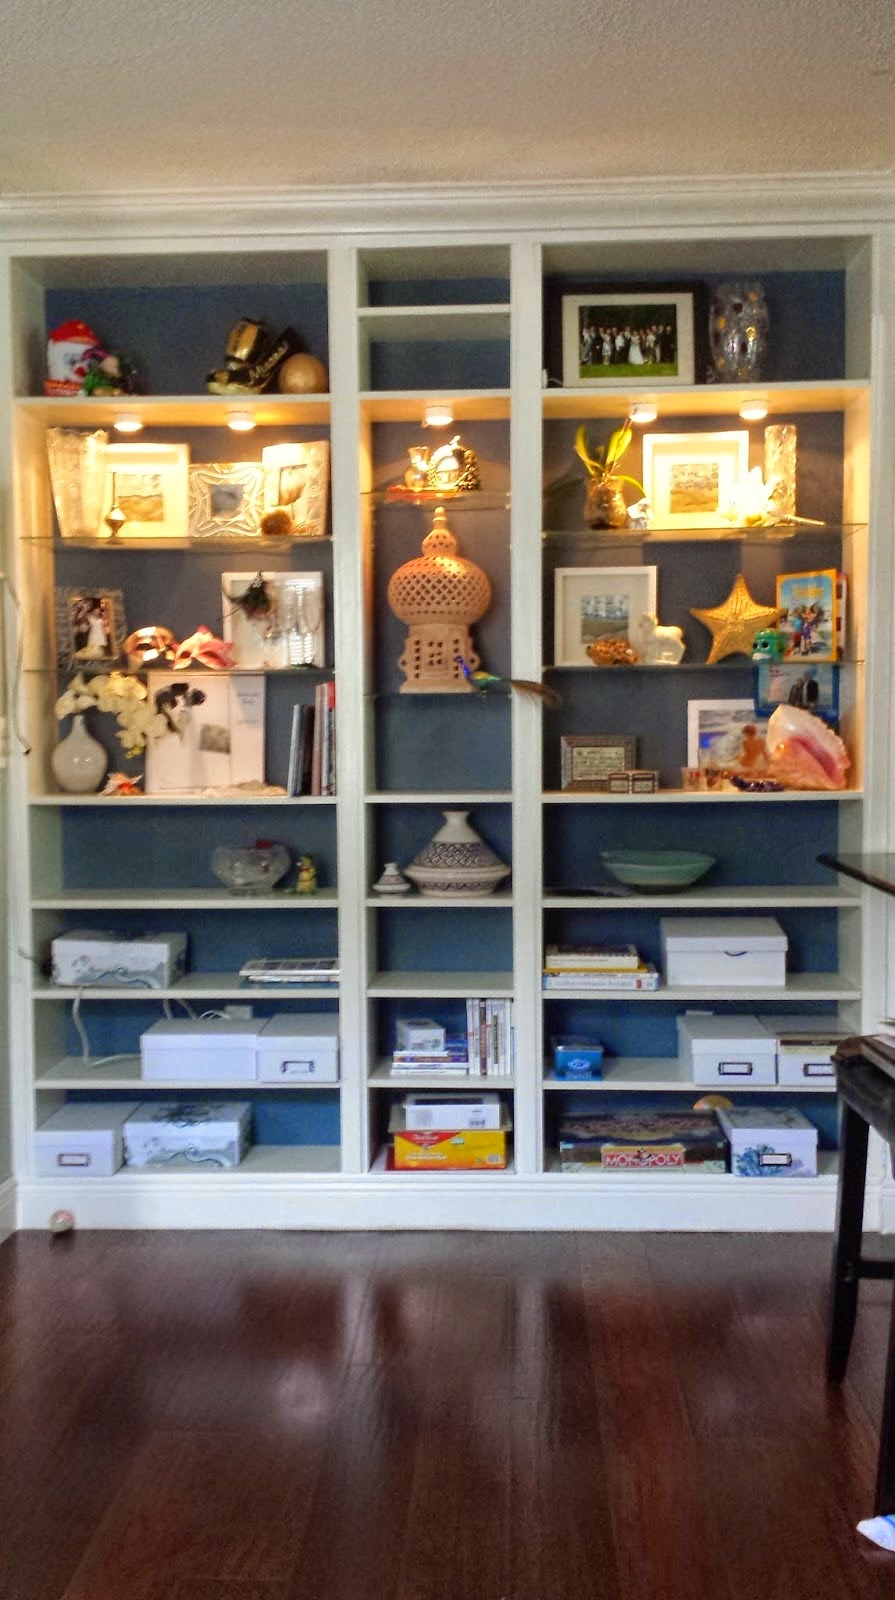
Project Featured on Meredith Vieira Show - Turn an IKEA Billy Bookcase into a Custom Built-in


I was thrilled to have the Meredith Vieira Show contact me about showing this project on one of their segments. I thought I would repost my blog post for easy viewing. 

We bought our house about 4 years ago and ever since, we have slowly been renovating the space. Although I love how the living room and kitchen turned out, I could never decide what to do with an awkward wall that was situated between the two open-plan spaces. I finally decided that a built-in would solve the issue, while also providing storage and a place to display decorative items. 

My next thing was figuring out how to built the built-ins without paying the built-in price. After scouring the internet, I saw that others have used IKEA furniture and transformed them into custom pieces (it's called IKEA hacking). The space where I wanted the built-ins to go was 7 feet width and 12 inches deep with a ceiling height of 8 feet. Below is our shopping list from IKEA and the hardware store. I have also provided step-by-step instructions on how you can make your own built-ins.

From IKEA:
  • (2) 31.5"W Billy Bookcases - click here
  • (2) 31.5"W height extension units (I wanted the built-ins to go all the way to the ceiling) - click here
  • (1) 15 3/4"W Billy Bookcase - click here
  • (1) 15 3/4"W height extension unit - click here
  • (4) 31.5"W glass shelves - click here 
  • (2) 15 3/4"W glass shelves - click here
From the hardware store:
  • 7' of crown molding
  • 7' of baseboard
  • 6 pieces of pine wood that was 1.5"W x 1/4"D x 8'L
  • Puck lights that came in a pack of 5
  • A dark blue paint (you can use any color)
  • Paint that would match the IKEA laminate - I went with Valspar Dove White from Lowes 
  • Primer
  • Liquid nail adhesive 
  • Caulk
  • Paint brush and roller
  • Nail gun
  • Saw to cut crown molding, baseboards and trim
  • Hammer
  • Screwdrivers - flat head and Phillips 

It took a while to complete this project, especially since the nearest IKEA to New Orleans is in Houston (a 5 hour drive). We decided to make a trip out of it, had an awesome time and then finished it off by visiting IKEA. The above picture is of some of our supplies. What a mess!

Definitely ask someone to help you with this kind of a project. It's way faster with help and looks better in the end. I was so lucky to have my husband, who always gets sucked into projects he doesn't want to do! We started off by building all three bookcase frames. 

I wanted to paint the backs of the bookcase a different color so that the finished piece would look more custom.

I laid out the backs all over my kitchen and started to paint. First paint with primer and then let dry.
 
I used a plate for my paint instead of that big plastic rectangle you are suppose to use. It is a lot easier to carry a plate around. I didn't want to ruin the plate so I wrapped it with plastic wrap. When I was done, I let the paint dry on the plate and then took the plastic wrap off.


We let the backs dry overnight, then installed them onto the frames. There's my husband hard at work :) 

Always fit the bookcase in the space and make a plan before you bolt anything down. There was a 1 1/2" gap between each bookcase and the wall. We already planned for this, so we were ready to start.

There was an existing electrical wire on the wall that we converted into an outlet so that we could install puck lighting.

We made sure to turn off the main electrical switch before messing with the electricity. 

We secured the bookcases to the wall with the provided hardware and then started to install the lighting.

We then put the extender pieces on top of the bookcase and secured those in place. My husband had to cut a hole in one of the bookshelf backs so that the electrical outlet could go through.

We then used a nail gun to add the baseboard and crown molding.

We used liquid nail adhesive, a nail gun and pine wood trim to cover the gaps in between the bookcases. I then used caulk everywhere to fill in any gaps.

I let the caulk dry and then primed and painted. I used Valspar Dove White paint from Lowes for the paint. It matches the existing laminate perfectly.

All done! This built-in made such a difference in our space. It really looks custom. It took a while to complete, but really wasn't too difficult of a project.

This is what it looks like with the glass shelves.


Thanks for viewing!!


Thursday, April 30, 2015

Easy and Accurate Way to Hang Up Frames


I seem to move my art and furniture around A LOT! This week I decided that I needed to move some picture frames to a reading corner. It seems like a simple enough project, but creating a symmetrical frame design can be difficult.

What you will need to hang art accurately:

  • All the art/frames you will be hanging
  • Tracing paper or any other rolled paper like wrapping or wax paper
  • Measuring tape
  • Pen/pencil
  • Picture hanger/nail


Start off by setting up your furniture and deciding how far from the floor you would like to hang your frames. I like to hang frames and art so that the middle of the piece is eye level. The rules are a little different when hanging gallery walls or multiple pieces. This tutorial will show you the easy way to figure out where to make a hole in your wall. 

Now that you know approximately where you want your frames, it's easier to decide how much spacing you want between each piece. I had 1 1/2 inch spacing for this project.

Lay out tracing paper and tape the sides together if you need a larger sheet. Set up your frames and measure the spacing so that they are all symmetrical. 

After all the frames are exactly where you need them, Use a pen to trace around each piece. 

Now that everything is traced, you can remove the frames. 

Tape the tracing paper to the wall behind your furniture. Now you have an opportunity to move the tracing paper around and position it in the perfect location. 

Now that you know where you want to hang, move your furniture so that you can easily access your wall. 

Now you can begin to hang!

Make sure to measure!


All done!