Friday, September 28, 2012

DIY Paint Dipped Pine Cones


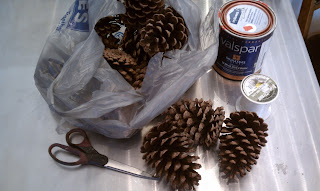
You can dip pine cones in paint to coordinated with the decor in your home. I dipped these pine cones in Pantone's color of the year which is Tangerine Tango. Follow the instructions below to make your own paint dipped pine cones.

What you will need:

  • Pine cones
  • Paint
  • Scissors
  • Sting or wire 


Tie string (I used clear) to your pine cone

Dip pine cone in paint and pull out with string.

Hang pine cones to dry. Make sure they are not touching anything. 

Let dry overnight.

Pretty! I might dip/spray paint some pine cones black for Halloween. 

Wednesday, September 26, 2012

DIY Painted Blood Glasses for Halloween


If you are having a Halloween party this year, these glasses can be given to your guests as party favors. They are extremely easy and inexpensive to make!

What you will need:

  • Glasses (I bought these at the dollar store for a whopping $1)
  • Glass paint and brushes 
  • Oven
  • Rubbing alcohol 

       
Wipe glasses off with rubbing alcohol. Use Vitrea 160 glass paint to make drip marks for the appearance of blood. Let dry 24 hours. Put glasses in cold oven and set to bake at 325 degrees. When oven comes to 350 degree temperature, set timer for 40 minutes. When timer goes off, turn off oven and open door slightly so that glasses do not cool off too quickly. Enjoy!

DIY Painted Pumpkin


Halloween is a month away, so some might want to start decorating for the holiday. Instead of carving your pumpkins for decoration, think about painting them instead. If pumpkins are displayed in a cool environment, they can last for the whole month (maybe even until Thanksgiving???) Just remember to paint a holiday-neutral design on the pumpkin.

To paint your own pumpkin, all you need to do is use water to clean the surface and then paint your design using acrylic paints. I painted my pumpkin New Orleans themed.


DIY Origami Ornaments Made From Magazine Paper


Click on the LINK to get the instructions on how to make individual origami flowers. After you learn to make the individual flowers, tape them all together to make a ball. I used magazine paper for these ornaments. Don't forget to tape in a ribbon to hang them from!


DIY Light Bulb Wreath and Tree


I tried to come up with some ideas for Christmas decorations last year that used lightbulbs because we had a ton of burnt out bulbs that I didn't want to throw away and was to lazy to recycle. The method of making the light bulb trees and wreath are the same, we just used different kinds of light bulbs.

What you will need:

  • Cardboard
  • Old light bulbs
  • Glue that can be used with glass
  • Old ribbon


Cut out a cardboard circle template.

 Lay out the light bulbs in a circle using the template as a guide for accuracy.

Drip glue where light bulbs meet. I used more glue on the bottom tiers to make sure the tree and wreath were stable. Keep building new layers, using less light bulbs each time.


My light bulb wreath and tree were featured on WAFB 9 News Baton Rouge

A New Look for a Faux Christmas Tree


If you bought an inexpensive faux Christmas tree last year, this might come in handy.

This is what you will need to give your Christmas tree a whole new look:

  • A faux tree
  • Snow in a can
  • A well ventilated space 
  • Can of snow (what you spray on windows to make them look like snow)


Unpack your Christmas tree and bend each branch individually to make it look fuller.Take the tree outside or in a well ventilated space. Shake the can of snow you bought and spray the tree down in long, even strokes. Keep the can 12"-18" away from tree when spraying, make sure you do not spray the snow too thick. Let dry for about half an hour and carefully carry the tree inside. Decorate however you would like.


DIY Game Day Cocktail Toothpicks


If you are having a football party, these cute cocktail toothpicks might come in handy. Below are the instructions on how to make them:

What you will need:

  • Cocktail toothpicks
  • Scissors 
  • Printer and paper
  • Double sided tape
  • Food!


 Print and cut out the images you want on your toothpicks. I used Microsoft Publisher to make my images.

After folding each rectangle in half, pierce each with a cocktail toothpick.

Use double stick tape to tape secure tooth picks in place.

DIY Iron-on New Orleans Saints T Shirts


Make your own t shirts by simply printing your design and ironing it on.

What you will need:

  • T-shirt
  • T-shirt transfers
  • Printer
  • Scissors
  • Iron 

Buy a package of t shirt transfers at your local arts and crafts store. They cost about $5 for a 3 pack, but they are worth the price. 

Find an image you like online, or make your own like I did. I used Microsoft Publisher. Print the image onto the t shirt transfer using the provided instructions. Then cut out each individual images.


 You can now iron the pieces onto a tshirt according to the transfer instructions.

Longue Vue - Tea for Two


Opening reception for the Tea for Two exhibit at Longue Vue House & Gardens

I wanted to post a table setting I set up with Chet Pourciau Design and Nola Flora for an event called Tea for Two that was held at Longue Vue House and Gardens. You can find more information about the event if you click on the link.

Opening reception for the Tea for Two exhibit at Longue Vue House & Gardens

DIY Beaded Fleur De Lis


This fluer de lis is the perfect as a Mardi Gras decoration. But since we live in New Orleans, we can get away with displaying it all year.

What you will need:

  • Foam core or cardboard
  • Newspaper (and a lot of it)
  • Box cutter
  • Packing tape
  • Clear drying glue
  • Hot glue
  • Mardi Gras beads (all the same shape/size) 


 Cut out a fleur de lis out of newspaper. Fold the newspaper in half so that it is symmetrical. 


 Trace the cut out onto foam core or cardboard (anything you have around the house)

Use a box cutter or exacto blade to cut it out.


Ball up newspaper and tape it to the cut out. You can ball up as much newspaper as you want to make more of a relief.   

Now you can start gluing Mardi Gras beads onto your masterpiece. Use hot glue to adhere beads on all the edges. I like to use hot glue in the beginning because it dry quickly, although I would not use it for the whole project because it doesn't hold as well as other glues. You can use any clear drying glue to adhere the rest of the beads onto the fleur de lis.

DIY Leather Masks


I can't wait for Halloween! Follow the instructions below to make your own unique Halloween or Mardi Gras mask.


What you will need:

  • Tracing paper/film
  • Scrap paper
  • A pencil
  • A piece of 6oz. leather
  • A bowl of water
  • An exacto knife or leather scissors
  • Acrylic paint
  • Polyacrylic spray

Sketch out your own mask on a piece of scrap paper.


Trace one side of the sketch you made with tracing paper or film. Now fold the paper in half and copy what you just traced on the blank half of the paper. Confusing I know! You must do this because you want a symmetrical mask.  

Now you can transfer your mask stencil onto a piece of 6oz. leather. Look for leather dealers locally or buy online for a deal. 


Use an exacto knife or leather scissors to cut out the mask. Be extra careful with this, you don't want to cut yourself or make unnecessary cuts in your leather mask.  

 Soak your cut out mask in water for 1-2 minutes until you can easily mold it. Hold it up to your face for a perfect fit. Allow your mask to dry overnight.  

Paint your mask with acrylic paints and decorate it with feathers and jewels. You can spray it with a polyacrylic spray to preserve your piece of wearable art.